 Search docs
Adding a product
To sell your products, add all the necessary details that your customers need to consider buying your products. You can group these products in categories and in their respective brands, and also add variants if your product is available in different options, such as size and color.
To add a product to your store, follow these steps:
-
In the Products page, select Add Products.
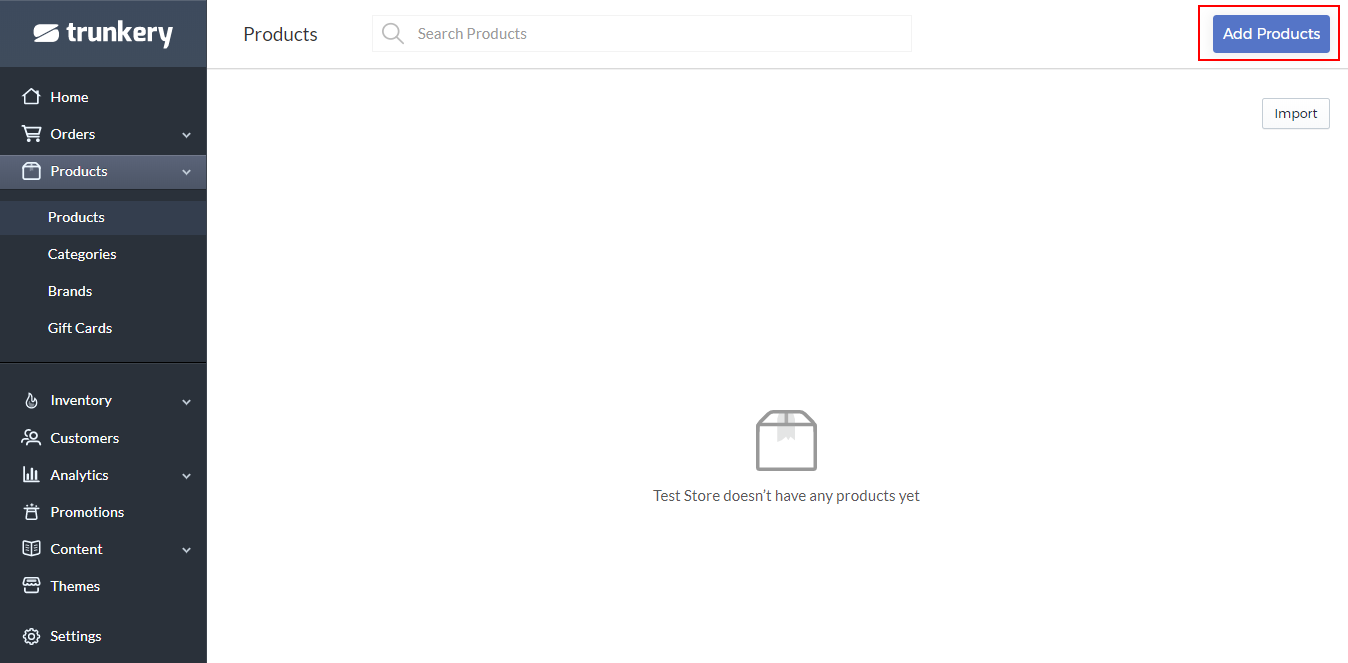
The New Product page is displayed.
-
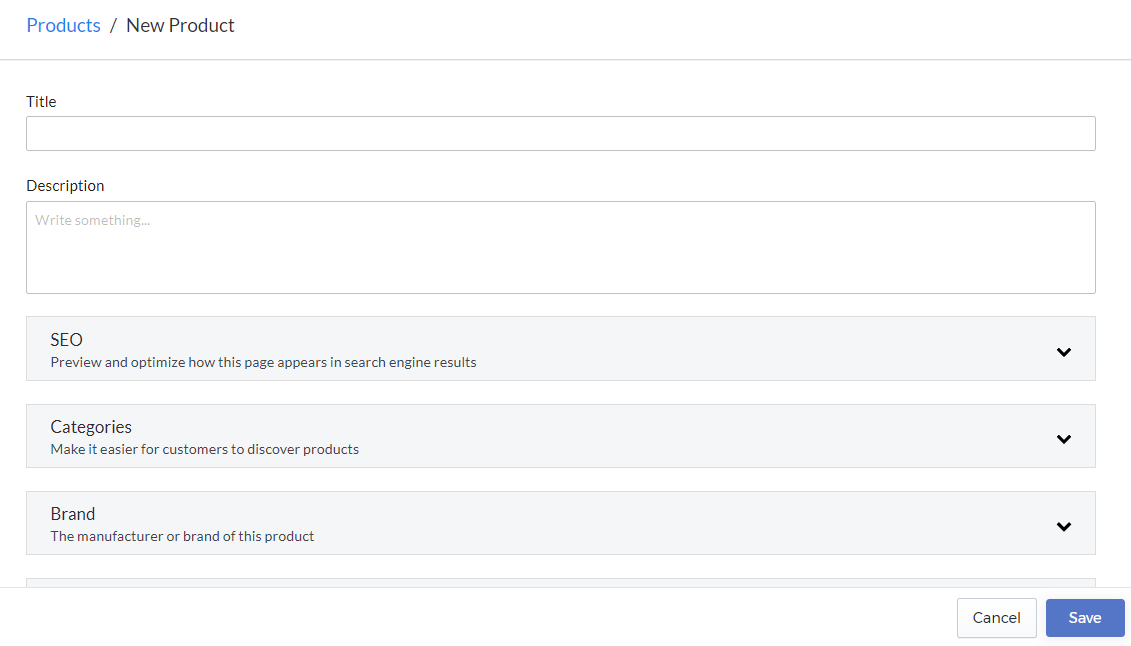
Enter the following details. These details are shown to your customers in the store.
- Title – refers to the name of the product.
- Description – refers to the information about the product. Create an informative description that will help persuade the customers to buy the product. You can format the text and add images, videos, emojis, and a separator to properly organize the information.
-
Configure the product according to these settings.
-
Select Save to save the new product. If the product is successfully added, it is displayed in the Products page.
SEO
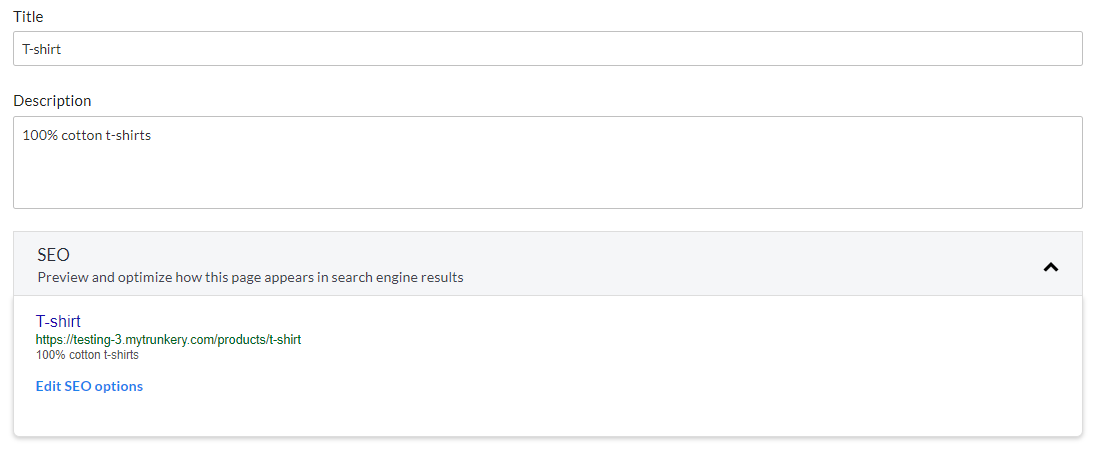
Select the SEO setting to preview and optimize how the product’s page appears in search engine results.
To edit the SEO options, follow these steps:
-
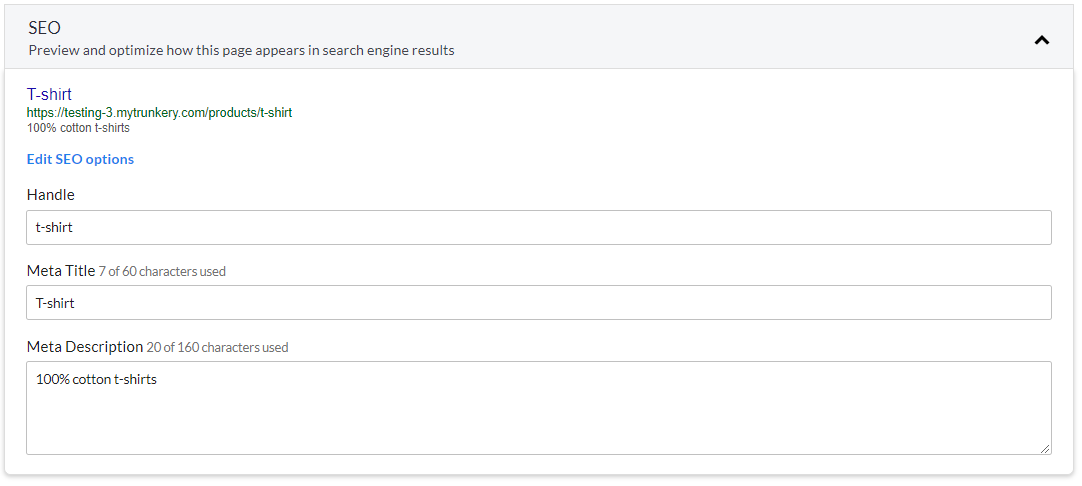
In the SEO section, select Edit SEO options. The following settings are displayed.
-
By default, the information you entered in the form is displayed. Modify the following details, if necessary:
- Handle – displays the product name in lowercase letters. Spaces and special characters in the product name are automatically replaced with a hyphen. You may add any text to the handle if preferred.
- Meta Title – displays the product name in its original format. The meta title describes the title of the page or the content of the URL. Use a maximum of only 60 characters.
- Meta Description – displays information about the page that is displayed in search engine results. Use a maximum of only 160 characters.
Categories
Select the Categories setting to choose the category to which the product belongs. If a product is added to a category, customers can see the product on the category’s page.

You can either type the category or select Browse to see and to select the available categories defined in the store.
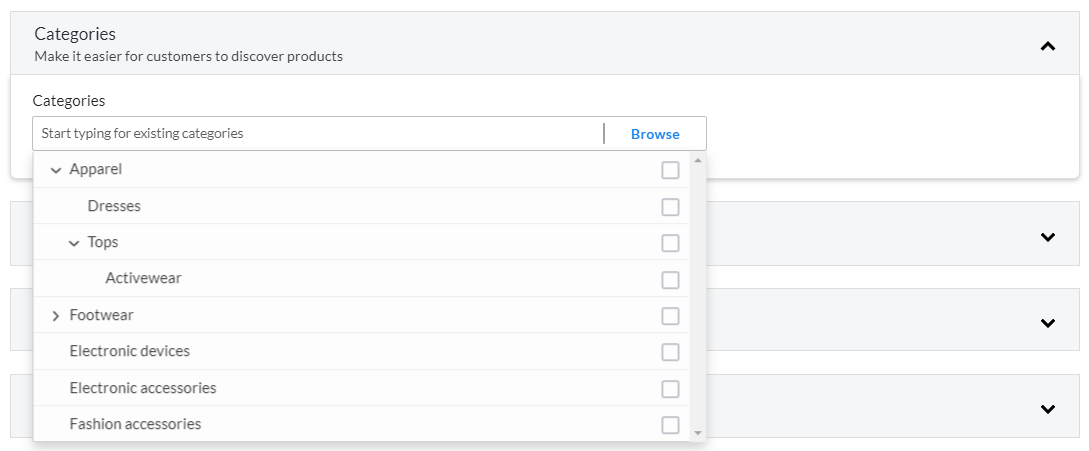
Note: You can select more than one category for a product.
Brand
Select the Brand setting to choose the manufacturer of the product. If a brand is selected, customers can see the product on the brand’s page.

Note: You can select only one brand for each product.
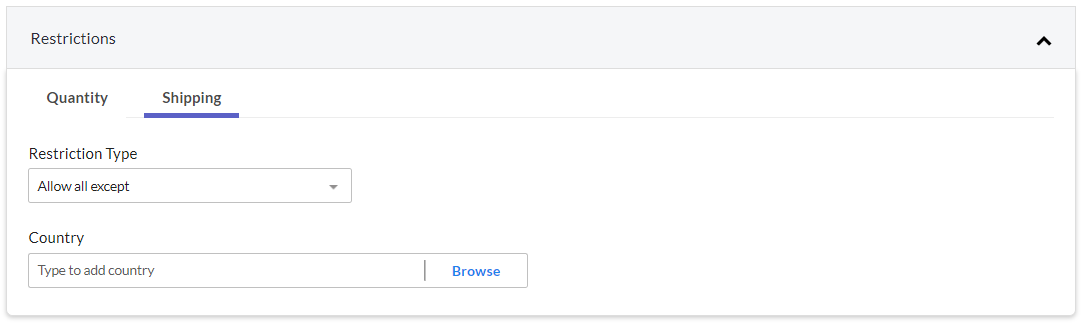
Restrictions
Select the Restrictions setting to set the quantity and the shipping restrictions for the product.
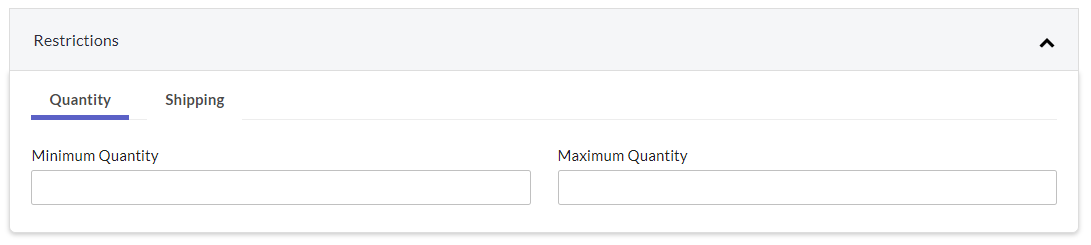
For the Quantity restriction, set the minimum and the maximum quantities of the product that the customer can purchase in a single transaction.
For the Shipping restriction, select the country where the product is either allowed or denied to be delivered.
Custom fields
Select the Custom Fields setting to add extra fields to a product. For example, if the product has an ingredients list or a part number, you can add custom fields to define these ingredients or part numbers.

These custom fields can contain any type of data (custom content), such as an object, string, number, Boolean, or date/time. The custom content is defined in a "content model".
To add a custom field to your product, follow these steps:
-
In the Custom Fields section, select the Apply content model dropdown list to display all the available content models.
-
Select the content model and configure it.
Note: Content models are created in the Settings section. For more information, refer to the Content Models section.
Visibility
Select the Visibility setting to choose when to publish the product’s page.
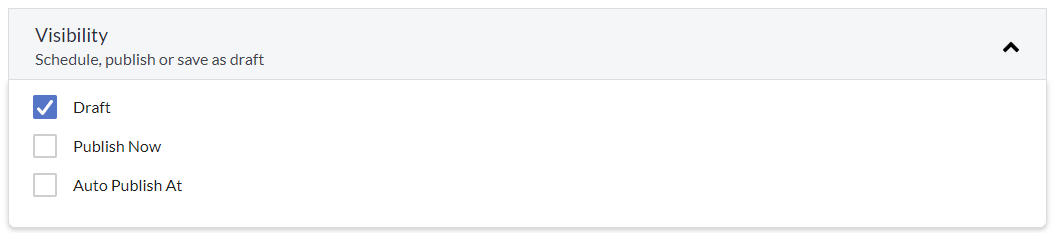
Select one from the following options:
- Draft – saves the product’s page as a draft, which can be published at a later preferred date and time.
- Publish Now – publishes the product’s page automatically after saving.
- Auto Publish At – publishes the product’s page automatically at a specified date and time. Select the preferred date and time from the available options.
Review dimension set
Select the Review Dimension Set setting to apply an existing dimension set to the product.

You can apply only an existing Review Dimension set to a product. To add a new Review Dimension set, refer to the Reviews section.
Pricing
Select the Pricing setting to enter the price details of the product.
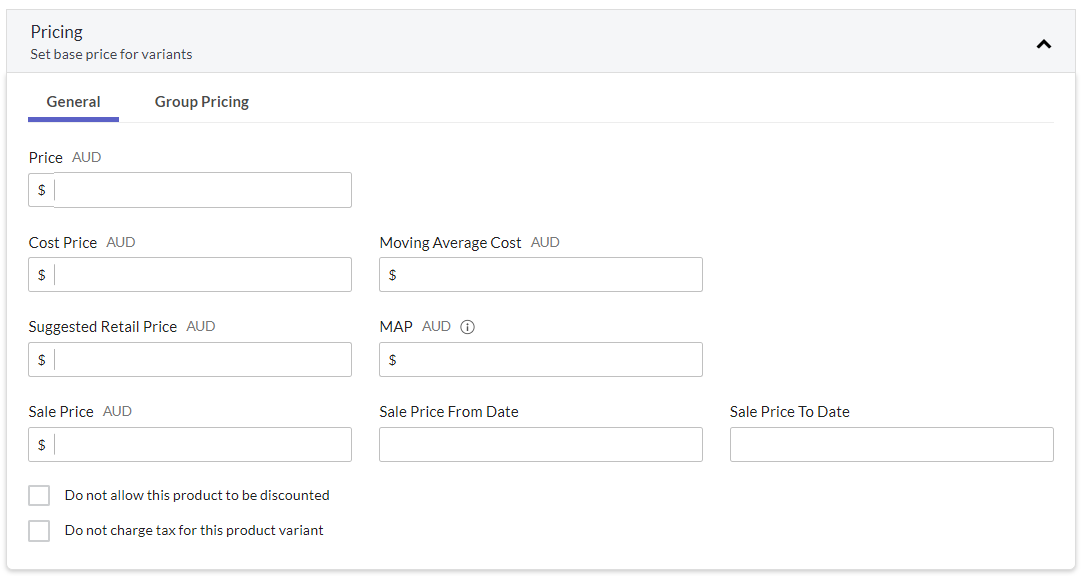
Setting the general pricing details
To set the general pricing details, follow these steps:
-
In the Pricing section, select the General tab and then enter the following details:
-
Price – refers to the normal price for a product variant.
-
Cost Price – refers to the price that the shop pays the supplier for the product. It is used in calculating the profit margin and to pre-fill the purchase order costs.
-
Moving Average Cost (read-only) – refers to the Moving Average Cost for all purchases of this product variant based on previous Purchase Orders.
-
Suggested Retail Price – refers to the brand’s recommended retail price.
-
Minimum Advertised Price (MAP) – refers to the minimum price that the brand allows to be displayed.
-
Sale Price – refers to the special discounted price of the product.
Note: You can optionally set specific dates to schedule the product price promotions in the Sale Price From Date and the Sale Price To Date fields.
-
-
Select the following options, as needed:
- Do not allow the product to be discounted - the product will not be discounted, such as if a customer uses a coupon or is eligible for any other promotion.
- Do not charge tax for this product variant - sales tax will not be charged for this product regardless of any tax rules.
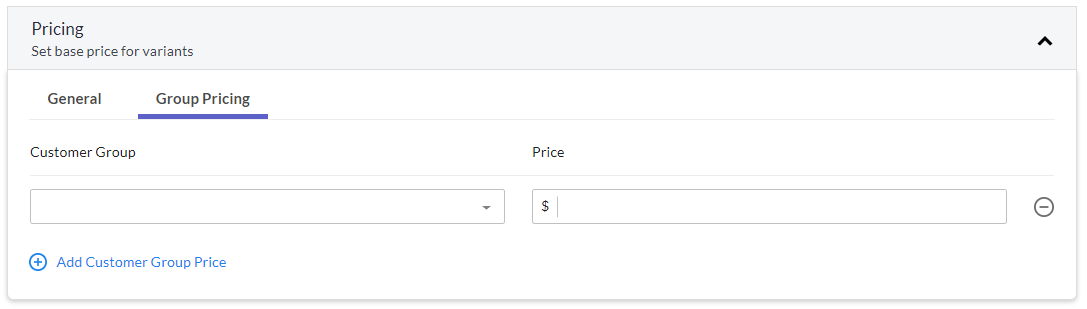
Setting the group pricing details
In the Group Pricing tab, you can set a particular price for each customer group. For example, if you want to charge a lower price for wholesale buyers of the product.
To set a group pricing, follow these steps:
-
In the Pricing section, select the Group Pricing tab.

-
Select Add Customer Group Price. The following fields are displayed.
-
Select a Customer Group from the dropdown list.
-
Enter the Price of the product for the selected customer group.
Customer groups are created in the Settings section. For more information, refer to the Customer Groups section.
Inventory
Select the Inventory setting to manage the product’s stock quantities and inventory settings.
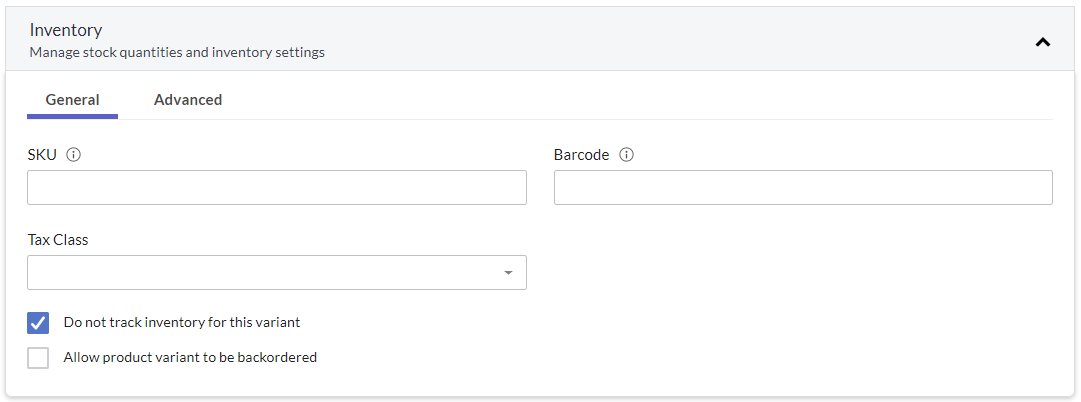
Configuring the general inventory settings
To set the general inventory settings of the product, follow these steps:
-
In the Inventory section, select the General tab and then enter the following details:
- SKU (Stock Keeping Unit) – refers to the internal identifier for a particular product variant.
- Barcode – refers to the GTIN, UPC, or another unique identifier set by the product brand or manufacturer.
-
Select a Tax Class from the dropdown list.
Important: Tax classes are used to differentiate between types of products and how they are taxed. For example, the standard GST/VAT is charged on most products but food GST/VAT is 0%. In this case, create a Tax Rule with two tax classes. For example, a "standard" VAT and a "zero" VAT. Then, apply the "zero" tax class to food items and the "standard" tax class to all the other products.
Note: Tax classes are created by creating a Tax Rule in the Settings section. For more information, refer to the Adding Tax Rules section.
-
Select the following options, as needed:
- Do not track inventory for this variant – if this option is selected, the app will not keep count of the inventory. This option is often used for digital goods or products that have no physical inventory.
- Allow product variant to be backordered - if this option is selected, the app will allow the Available inventory count to become negative.
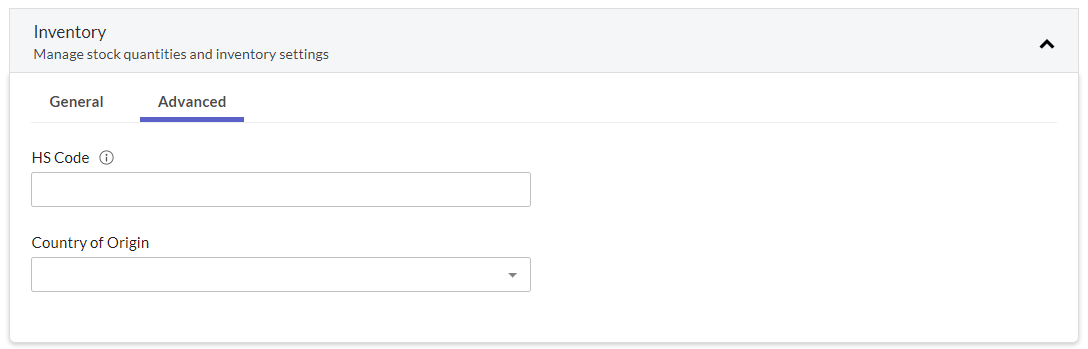
Configuring the advanced inventory settings
To set the Advanced inventory settings, follow these steps:
-
In the Inventory section, select the Advanced tab.
-
Enter the following details:
- HS Code – refers to the harmonization system code. This code is used for tax calculation and for international shipping.
- Country of Origin – refers to the country where the product was manufactured. This information is used for international shipping and tax or duty calculation.
Product type, weight, and dimensions
Select the Product Type, Weight, and Dimensions setting to set the product type and its weight and dimensions. These details are used when shipping the product.

To set the product’s type, weight, and dimensions, select a product type from the dropdown list in the Product Type, Weight, and Dimensions section. The product type can be one of the following:
- Physical
- Gift Card
- Digital Good
- Service
- Bundle
Physical
If the product type Physical is selected, the following fields are displayed.
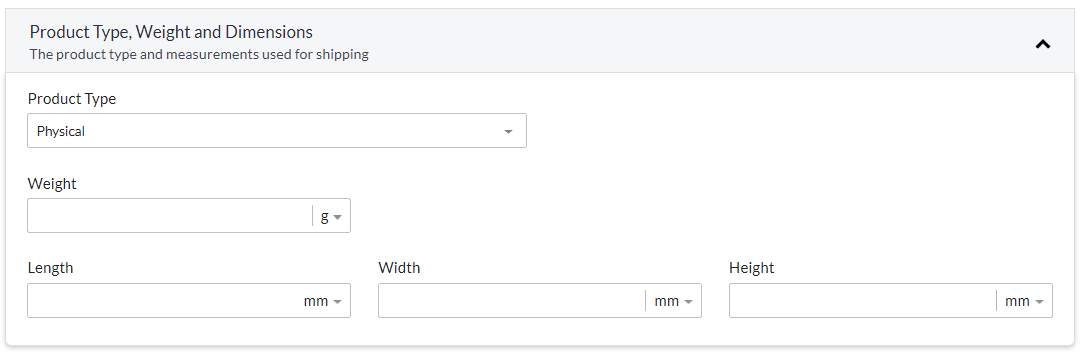
Enter the following details:
- Weight
- Length
- Width
- Height
Gift Card

Gift cards are stored-value money cards used by customers to purchase products in your store as an alternative to cash.
Digital Good
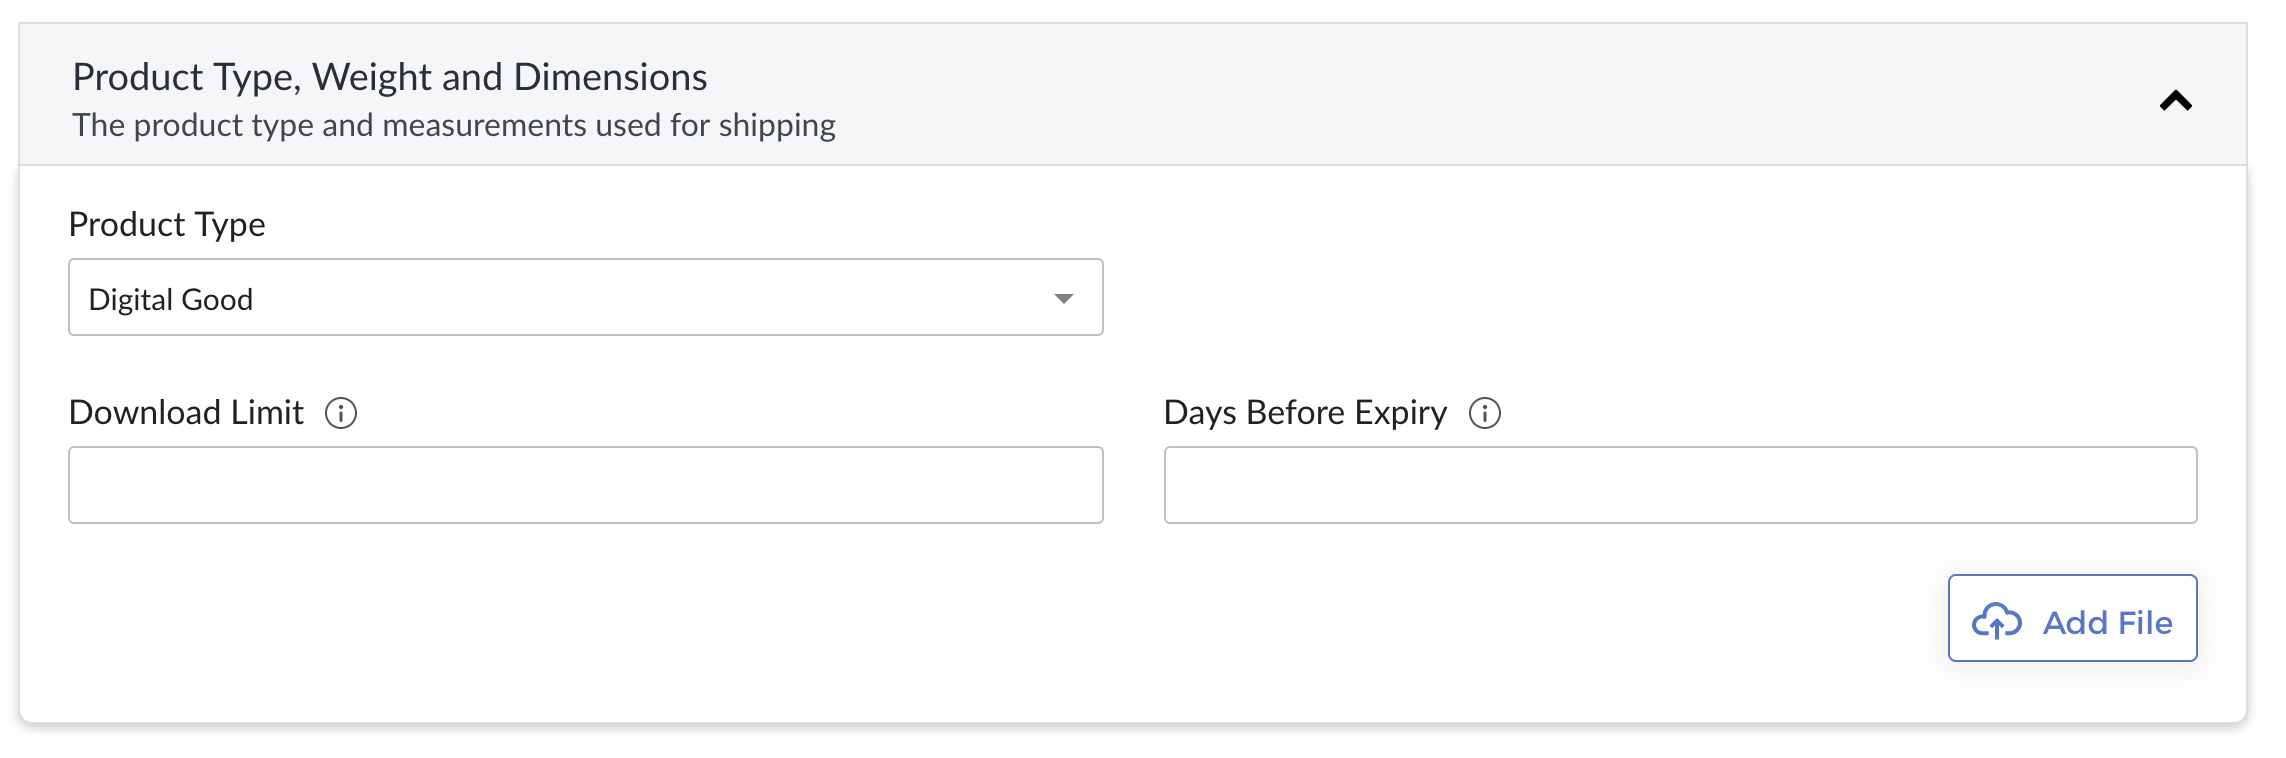
Examples of digital goods include movies, music, games, applications, art, and digital designs that are delivered in digital formats.
Enter the following details:
- Download Limit - refers to the maximum number of times the customer can download the file.
- Days Before Expiry - refers to the number of days until the digital download link expires.
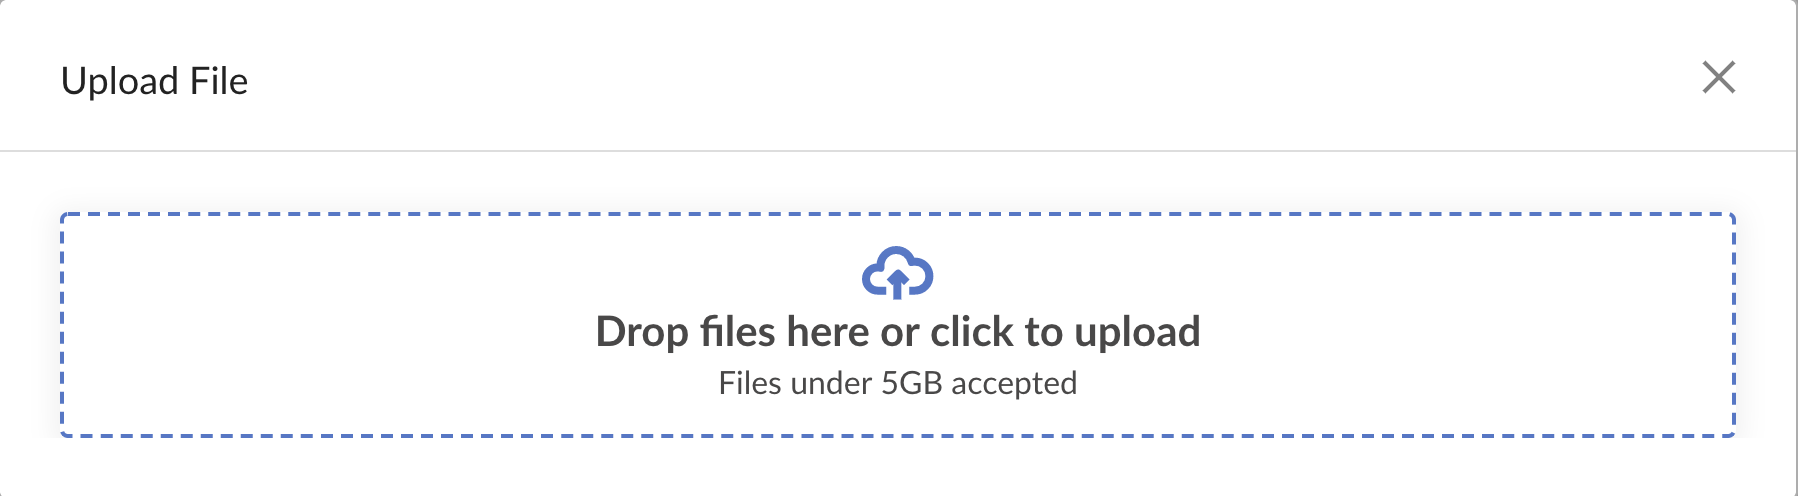
Select Add File to add a digital file. The maximum file limit is 5GB.
Service

Services include products such as appointments, online coaching, or event tickets.
Bundle
If the product type Bundle is selected, an additional section is displayed to select the bundled product. Type the name of the product and then select it.

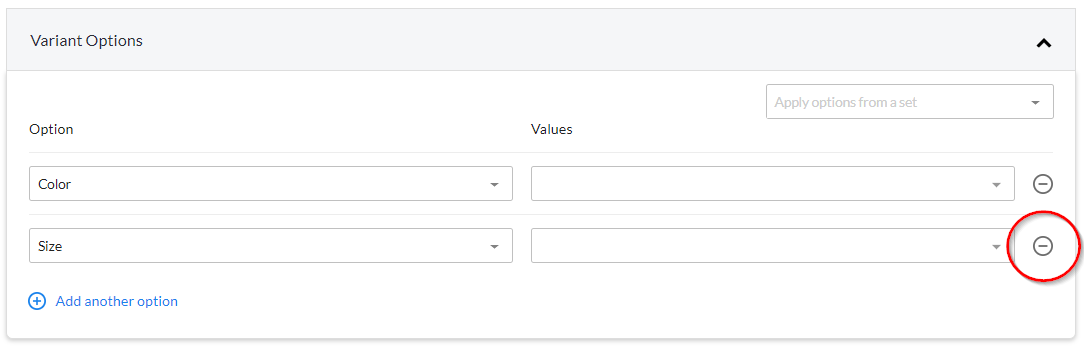
Variant options
Select the Variant Options setting to set the different options of the product, such as size and color. The product variants are automatically created after adding the variant options.

There are two ways to add a variant option for a product.
- Through an option set
- Through manual addition
Adding options from an option set
To add a variant option from an option set, follow these steps:
-
In the Variant Options section, select an option set from the Apply options from a set dropdown list.
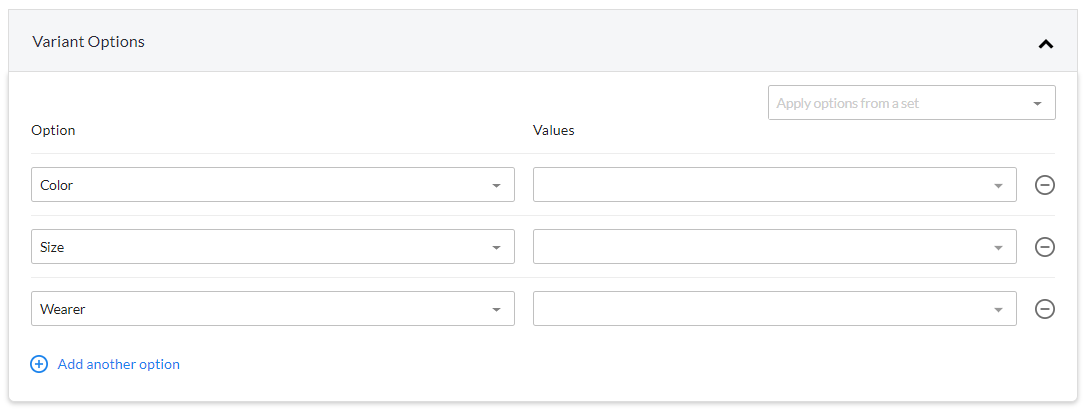
Note: Option sets are created in the Settings section. For more information, refer to the section on creating option sets. In this example, we select the Size and Color option set.

-
The option set’s are displayed.

Notes: Take note of the following:
-
If one of the options is not applicable for a product, remove it by selecting the remove icon next to the Values field.
-
If you need to add another option that is not included in the selected option set, select Add another option, and then enter a new option and its values. In this example, we added the Wearer option.
-
Select the Values of the options in which the product is available for purchase. For example, if the product is available in the colors red and blue, add these values in the Values field of the Color option. In the following example, we have defined the options and values in which the product is available.
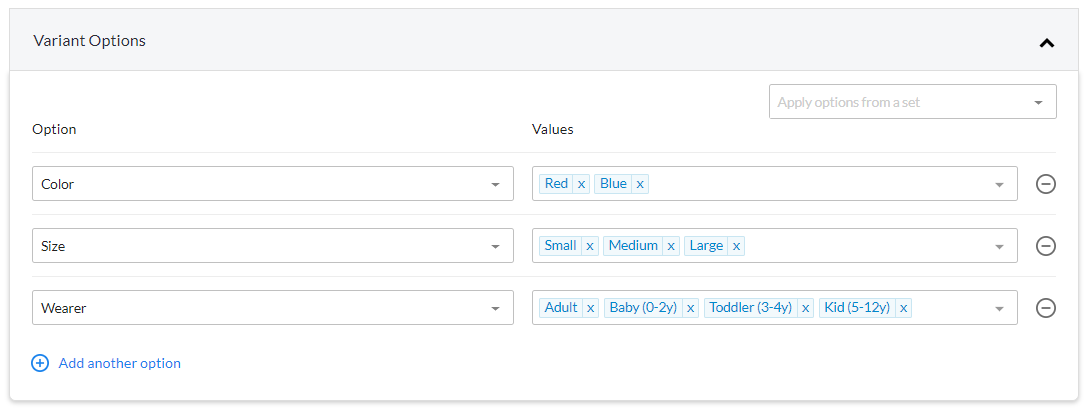
You can manually add a value if it is not available in the option’s list of values. Just type the value and then press Enter.
Note: Options and their values that are part of an option set are created in the Settings section. For more information, refer to the section on creating options and values.
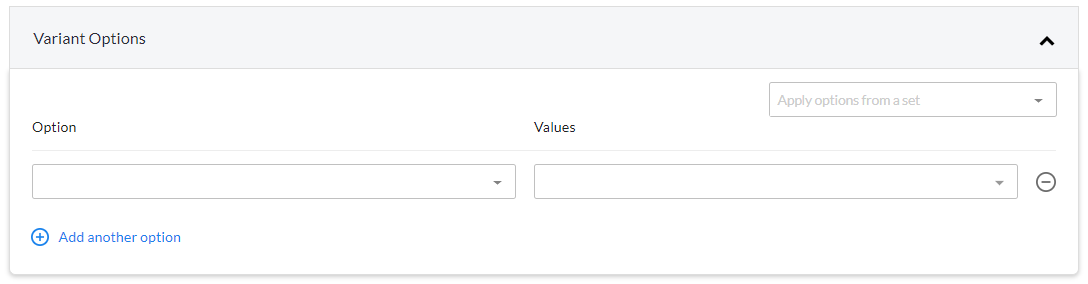
Adding options manually
You can manually add an option for a product if the option is not yet created in the Settings section. To manually add options, follow these steps:
-
In the Variant Options section, select Add option.

-
Enter the option name and its values in the Option and Values fields, respectively.
Variants
After adding the variant options, the Variants section is automatically created. Select this section to display all the product variants in which the product is available for purchase, and to set the price, SKU, barcode, and image of each of these variants.
Note: The following image file types are supported: JPEG, HEIC, GIF, PNG, WebP.
